


When you’re building your WooCommerce store, you’ll need to set up tax and tax rates. Despite the fact that taxes are a complicated subject, WooCommerce Tax Settings simplifies the process of implementing them.
To decide the appropriate course of action and the rules that apply to your firm, state, and country, you should get assistance from a tax consultant or accountant. Because each firm is unique, the consultation will help you make the best decision.
This page contains important information about WooCommerce tax settings.
Table of Contents
How to Enable Taxes
To use the WooCommerce tax settings panels, you must first enable them.
- Go to “WooCommerce” > Settings > General.
- Select the “Enable Taxes” and “Tax Calculations” checkbox.
- Save changes.
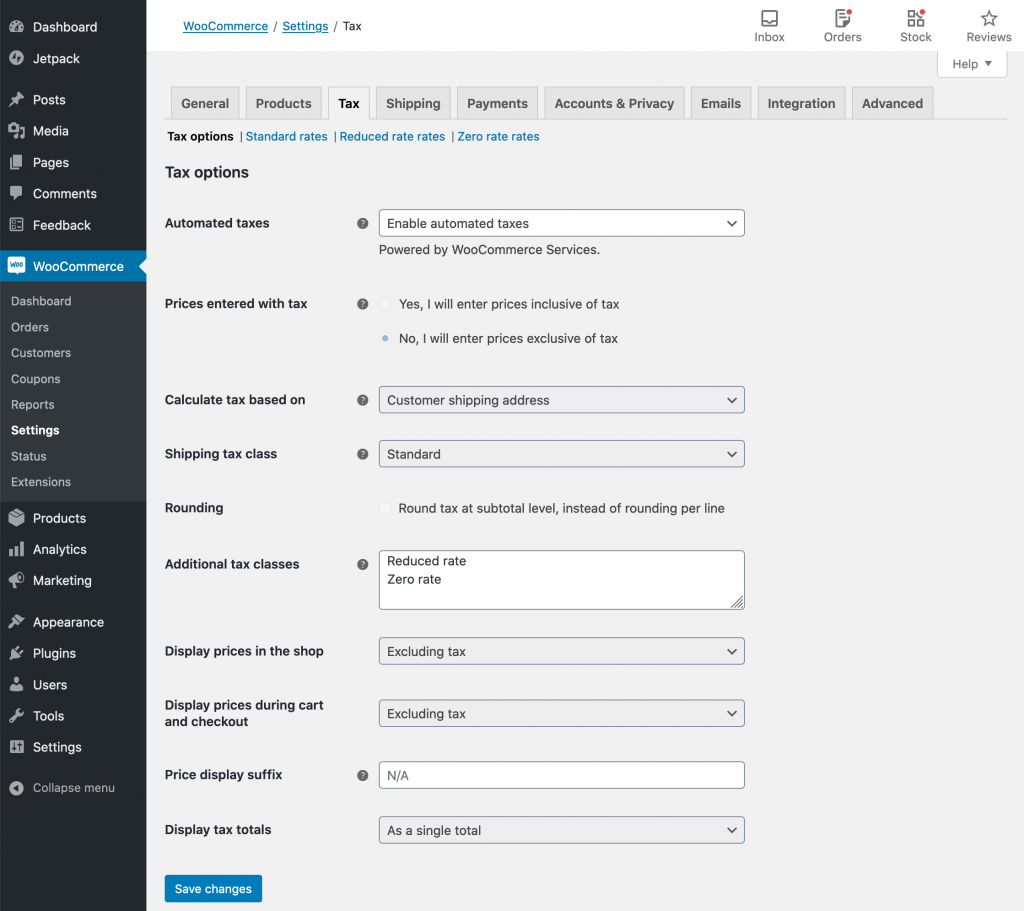
How to Configure Tax Options
To set up taxes, follow these steps:
• Select WooCommerce > Settings > Taxation from the drop-down menu (this tab is only visible if taxes are enabled).
•The Tax tab provides a variety of settings that you can tailor to your specific needs.
The parameters you select are determined by the tax jurisdiction in where your online store is located.
Also Read: Which One Is Better As Security Perspective: Magento Or WooCommerce?
How to Set Up Taxes in WooCommerce
Follow this guide to take advantage of WooCommerce tax:
Setup and Configuration
The Tax feature of the WooCommerce Shipping & Tax plugin is documented in the setup guide on the WooCommerce Shipping & Tax page. For further information on how to set up taxes in general, see the Setting Up Taxes in the WooCommerce guide.
Automated Tax Calculation
Go to WooCommerce > Settings > General and tick “Allow Taxes and Tax Calculations” to enable Automated Tax Calculation.
The Automated Tax Calculation is affected by the price you provide minus the tax. “Automated Taxes” should be enabled in “Settings” > “Tax”> “Save Changes.”
When you enable Automated taxes, Automated taxes “take over” the WooCommerce main tax options, thus most of them are disabled. After that, the “Display prices” will be set to Excluding tax, and tax will be calculated depending on the Customer delivery address.
For your EU-based store, use the EU VAT Number extension and automatic taxes.
Troubleshooting

To fix WooCommerce Services setup errors, go to WooCommerce > Status > WooCommerce Shipping & Tax. Turn on “Debug” or “Logging” once you’ve worked out what’s incorrect.
The system status page shows any faults that could cause WooCommerce Services to fail. It offers links to extra resources as well as important debug information.
Updated tax requests can be located in WooCommerce > Status > WooCommerce Shipping & Tax’s “Taxes Log” section. To view older requests, go to WooCommerce > Status > Logs.
Also Read: Why Should You Choose WooCommerce Development Platform for Your Startup?
Because WooCommerce Services uses your online store address (WooCommerce > Settings > General), you must use this setting to add the new location where your physical store will be located.
In the Standard tax rates area (WooCommerce > Settings > Standard rates tab), the extra information can be eliminated. To reset the plugin to your new location while utilizing automated rates, you’ll need to remove the normal pricing.
Conclusion
So now you have a thorough understanding of WooCommerce tax settings. Follow the steps mentioned above to enable, customize, and set up tax options.

Thanks for reading our post “WooCommerce Tax Settings!”, please connect with us for any further inquiry. We are Next Big Technology, a leading web & Mobile Application Development Company. We build high-quality applications to full fill all your business needs.